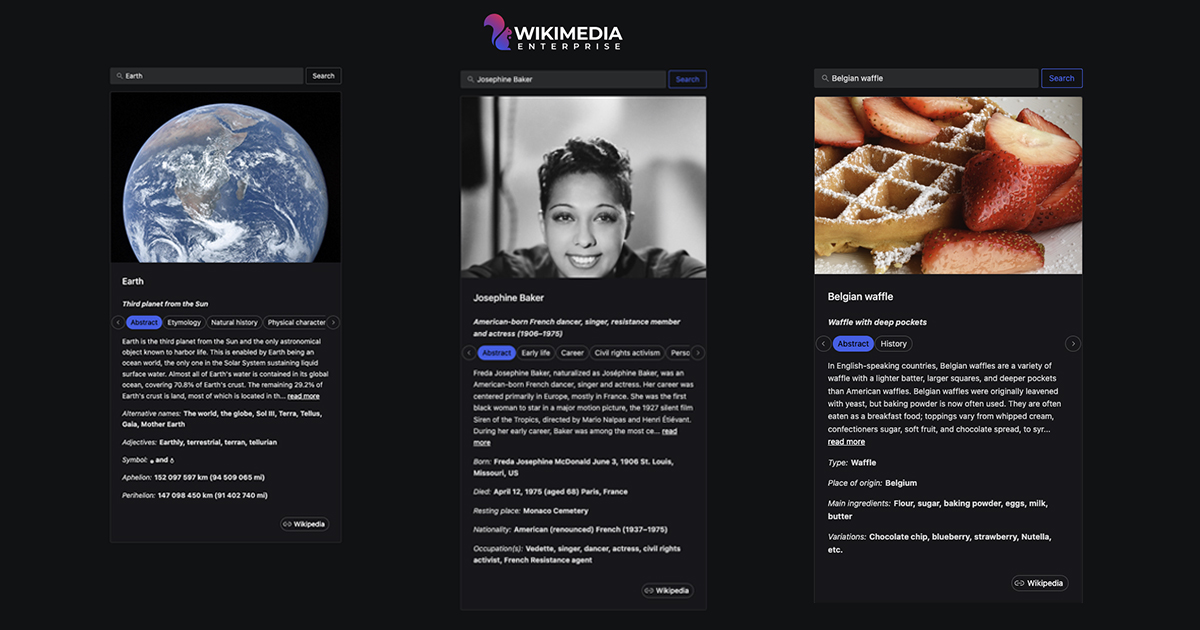
A knowledge panel is one of the primary use cases of reusing Wikipedia and Wikimedia content within search. Also referred to as an information card or info box, a knowledge panel summarizes important facts of a specific subject in an easy to read format. We believe the best approach to clarify this concept is through visualization, as we often say, “A picture is worth a thousand words.” In this technical tutorial we will walk you through using the Structured Contents articles endpoint, part of the Wikimedia Enterprise On-demand API, to build an interactive knowledge panel that can be added to any webpage or application.

Throughout this tutorial, we’ll utilize Vue.JS to first build a Wikipedia-based “search engine” which will then enable us to display a basic Knowledge Panel UI of Wikipedia data via our Structured Contents articles endpoint.
An outline of what you’ll need to get started:
- An empty Vue.js project using TypeScript. You can find an excellent quick start guide on their website.
- A free Wikimedia Enterprise account. You can easily sign up for one here. This tutorial is designed so that you can use the free account and don’t need to pay for anything.
How to build a Knowledge Panel with Wikipedia data
Assuming you already have a local Vue.js project set up, the first step is to install the dependencies we’ll be using throughout this tutorial. We’ll start by installing the library we need to develop UI components. Install Naive UI by running the following command in your project’s root directory:
npm i -D naive-uiWe’ll also need to install fonts for the app. You can do this by running the following command:
npm i -D vfontsAnd the last part we’ll need is icons, so let’s run this one as well:
npm i -D @vicons/fluentTo give you the ability to navigate this article and use it as a guide in your work, we’ll provide a quick reference beforehand so you can jump to the specific part you’re interested in:
- Build an Authentication API library
- Build an Opensearch API library
- Build a Structured Contents API library
- Build an Authentication UI
- Build a Search Panel UI
- Build UI for the Knowledge Panel
- Putting it all together
Build an Authentication API library
Let’s start by considering authentication. If you’ve already signed up for a free Wikimedia Enterprise account, the authentication documentation should give you a good idea on what we are going to do. If you haven’t signed up yet, follow this link to create an account.
In this build, we’ll handle authentication in a modal window. This modal will appear when someone visits the application’s main page and will ask for their Wikimedia Enterprise credentials. Once they log in, we’ll use those credentials to make queries to WME APIs. We’re focusing on the API integration logic in this step. Building the user interface for authentication will be covered later in the tutorial.
To abstract the business logic from our view representation, we’ll create a simple authentication library. Let’s create a file named src/libraries/auth.ts and add the following code:
export interface LoginRequest {
  username: string
  password: string
}

export interface LoginResponse {
  access_token: string
  refresh_token: string
  expires_in: number
}

export interface RefreshTokenRequest {
  username: string
  refresh_token: string
}

export interface RefreshTokenResponse {
  access_token: string
  expires_in: number
}

export interface IAuth {
  login(req: LoginRequest): Promise<LoginResponse>
  refreshToken(req: RefreshTokenRequest): Promise<RefreshTokenResponse>
}

export class Auth implements IAuth {
  constructor(private _url: string = 'https://auth.enterprise.wikimedia.com/v1') {}

  async login(req: LoginRequest): Promise<LoginResponse> {
    const res = await fetch(`${this._url}/login`, {
      method: 'POST',
      body: JSON.stringify(req),
      headers: {
        'Content-Type': 'application/json'
      }
    })

    const body: any = await res.json()

    if (res.status !== 200) {
      throw new Error(body.message)
    }

    return body as LoginResponse
  }

  async refreshToken(req: RefreshTokenRequest): Promise<RefreshTokenResponse> {
    const res = await fetch(`${this._url}/token-refresh`, {
      method: 'POST',
      body: JSON.stringify(req),
      headers: {
        'Content-Type': 'application/json'
      }
    })

    const body: any = await res.json()

    if (res.status !== 200) {
      throw new Error(body.message)
    }

    return body as RefreshTokenResponse
  }
}
In the code above, we’re implementing two main methods: login and refreshToken. Let’s delve a bit deeper into their purposes.
The login method is straightforward. You provide your Wikimedia Enterprise username and password, and in return, you receive a JSON Web Token (JWT) access token. This method utilizes the following endpoint to achieve this. It’s important to note the structure of the response data from this API call:
{
  "id_token": "...id token...",
  "access_token": "...acesss token...",
  "refresh_token": "...refresh token...",
  "expires_in": 300
}
If we look at the API response from the login endpoint we can see that we receive not just a single access token, but multiple and with additional data fields. In terms of our use case we are focusing on these three fields:
access_token– this is a JWT token we’ll include in our HTTP requests to authenticate ourselves and ensure permission to access specific API endpointsrefresh_token– this is another JWT token we’ll use to receive a new access token after the access token expiresexpires_in– this is a time in seconds that signals when the access token expires, so that we can refresh it in a timely manner
Now, let’s bring everything together and take a look at the library code to see how we’ll use our authentication library. We’ll leverage the login method to acquire the initial set of tokens. Then, we’ll utilize the refreshToken method to refresh the access token before it expires.
Summary
In this part of the tutorial, we’ve demonstrated how to handle authentication in the WME APIs. However, this example is relatively straightforward and may not encompass real-life scenarios entirely. In many cases, you’d need to store your credentials and tokens securely within your infrastructure, and implement token rotation using a scheduled job to prevent hitting the limit of available access tokens in the API. But, that topic is a story for another time. If by any chance you’re using Golang, feel free to utilize our SDKs to help integrate WME APIs into your server-side applications. However, for now, we’re dedicated to continuing the development of our knowledge panel, so let’s stick with that.
Build an Opensearch API library
To render a knowledge panel, we’d need to select a specific Wikipedia page from which to extract data. This implies that users of our application would need to know the Wikipedia page they’re interested in and its exact name. To simplify their experience, we can integrate the Opensearch API to provide suggestions as users type the page name into the search input.
We’ll kick off by crafting a basic client that will help us abstract the API integration logic from the main application, thus improving code readability. So go ahead and create a file src/libraries/wmf.ts and add with the following code:
export interface IWMF {
  getSuggestions(query: string): Promise<any[]>
}

export class WMF implements IWMF {
  constructor(private _url: string = 'https://en.wikipedia.org/w/api.php') {}

  async getSuggestions(query: string): Promise<any[]> {
    const body = new URLSearchParams()
    body.append('action', 'opensearch')
    body.append('search', query)
    body.append('namespace', '0')
    body.append('limit', '10')
    body.append('format', 'json')
    body.append('formatversion', '2')
    body.append('origin', '*')

    const res = await fetch(this._url, {
      method: 'POST',
      body,
      redirect: 'follow'
    })

    return res.json()
  }
}
We won’t delve into the specifics of the Opensearch API. If you’re curious, please visit the documentation page for more information. In the provided code, we create an interface and a corresponding class. That enables us to utilize the getSuggestions method for querying the Opensearch API and retrieving suggestions based on the user input text.
Summary
We’ve built a small but important part of the application, which will significantly enhance the user experience. Another point we wanted to demonstrate is that if you’re already using some of the Wikimedia APIs in your application, you can integrate them with Wikimedia Enterprise APIs in a complementary manner.
Build a Structured Contents API library
We’ve already explored the Wikimedia Enterprise authentication APIs. Next, we’ll integrate the Structured Contents data. Let’s guide you through the process of choosing the appropriate API for your project. Let’s start by reviewing the current api offerings:
- Snapshot API is ideal for bulk data downloads. It provides a large compressed file (tar.gz) containing the entire dataset you can import into your own data store.
- On-demand API allows you to retrieve specific data on demand. You can query for information using elements like article names, getting exactly what you need when you need it, instead of downloading the entire dataset.
- Realtime API provides a continuous stream of updates from all Wikimedia projects. It’s often used in conjunction with the Snapshot API to keep your local copy of the data synchronized with the latest changes.
Our APIs leverage the RESTful architectural style, making them easy to learn for developers. However, before diving into the integration process, let’s clarify some key terms related to Wikimedia universe:
- Project – this refers to a specific Wikimedia project, like the English Wikipedia (“enwiki”) or the German Wikipedia (“dewiki”), each project has a unique identifier.
- Code (project code) – identifies the type of project. For example, “wiki” represents Wikipedia projects, while “wiktionary” represents Wiktionary projects.
- Language – as you might guess, language is an important factor in our APIs. For example, the English language has multiple associated Wikimedia projects.
- Article – is essentially a Wikipedia page, like the page about Josephine Baker on the English Wikipedia. You can find more information in our data dictionary.
- Namespace – since everything in Wikipedia is a page, these pages are further categorized by purpose using namespaces. There are many namespaces, and you can find more information about them here. For instance, Josephine Baker’s article page resides in the main namespace (namespace 0).
With this understanding of Wikimedia Enterprise API offerings, you should have a good grasp of their functionalities. Now, let’s delve into the Structured Contents data. In essence, this API was created to transform Wikipedia content into a machine-readable format by breaking it down into structured components. This allows for easier integration and analysis of Wikipedia data. If you’d like to explore this topic further, you can read more in our release blog post. At the moment the API is in beta, and offers only an On-demand endpoint. Although, we are actively working on productionisation of it, and to introduce it to other API offerings such as Snapshots API.
Getting back to our Knowledge Panel project, we can now create a file called src/libraries/wme.ts and put the following code into it:
// Define constants for part types
export const PartTypeSection = 'section'
export const PartTypeParagraph = 'paragraph'
export const PartTypeField = 'field'

export interface Image {
  content_url: string
}

export interface InfoBoxes {
  name: string
  type: string
  has_parts?: Part[] // An InfoBox can have nested parts
}

export interface Part {
  type: string
  name?: string
  value?: string
  has_parts?: Part[] // A Part can have nested parts
}

export interface StructuredContent {
  name?: string
  url?: string
  image?: Image
  infoboxes?: InfoBoxes[]
  sections?: Part[] // An article can have multiple sections, each with its own parts
  abstract?: string
  description?: string
}


export interface IWME {
  get accessToken(): string
  set accessToken(accessToken: string)
  getStructuredContents(name: string): Promise<StructuredContent[]>
}

export class WME implements IWME {
  private _accessToken: string = '' // Private variable to store the access token

  constructor(private _url: string = 'https://api.enterprise.wikimedia.com/v2') {}

  get accessToken(): string {
    return this._accessToken
  }

  set accessToken(accessToken: string) {
    this._accessToken = accessToken
  }

  async getStructuredContents(name: string): Promise<StructuredContent[]> {
    const res = await fetch(`${this._url}/structured-contents/${name}`, {
      method: 'POST',
      body: JSON.stringify({
        limit: 1,
        fields: ['name', 'url', 'image', 'infoboxes', 'description', 'abstract', 'sections'],
        filters: [
          {
            field: 'in_language.identifier',
            value: 'en'
          }
        ]
      }),
      headers: {
        'Content-Type': 'application/json',
        Authorization: `Bearer ${this._accessToken}`
      }
    })

    return res.json()
  }
}
Let’s take a closer look at the code snippet, focusing on the crucial getStructuredContents method. You might notice that we’re using a POST request to the endpoint. This is because our API allows specifying parameters within the JSON request body, whereas not all API clients support adding a JSON body to GET requests.
In the request body you’ll see a couple parameters: limit, fields and filters. While limit is fairly self-explanatory, you might wonder why we need to limit the response. The primary reason is that our endpoint searches across all projects by default. This means that querying for Josephine Baker’s page would involve searching for that page across all language wikipedia projects as well as other projects like Wikiquotes we include, potentially resulting in a large response. The limit parameter helps control the amount of data returned. The fields parameter allows us to control which fields are included in the payload, ensuring we only receive the data we need, for faster and more efficient requests. Currently, the Structured Contents endpoint includes the following fields, specific to pre-parsed wikipedia content:
- abstract – brief description of what the article is about.
- description – one-sentence description of the article for quick reference.
- image – the main image representing the article’s subject.
- infoboxes – parsed information from the side panel (infobox)l on the Wikipedia article.
- sections – parsed sections of the article, including links.
Last but not least, the filters parameter offers a powerful filtering capability. It allows you to specify which data to receive based on language, project, namespace, or other relevant fields of the queried object. In our example we are only interested in articles that are in the English language.
The API response provides the data we use to render our Knowledge Panel. Here’s an example of a JSON response you’d receive if you queried the API using the code in our example:
[
  {
    "abstract": "Freda Josephine Baker, naturalized as Joséphine Baker, was an American-born French dancer, singer and actress...",
    "name": "Josephine Baker",
    "url": "https://en.wikipedia.org/wiki/Josephine_Baker",
    "image": {
      "content_url": "https://upload.wikimedia.org/wikipedia/commons/0/0b/Baker_Harcourt_1940_2.jpg",
      "width": 540,
      "height": 756
    },
    "description": "American-born French dancer, singer, resistance member and actress (1906–1975)",
    "infoboxes": [
      {
        "name": "Infobox person",
        "type": "infobox",
        "has_parts": [
          ...,
          {
            "name": "Born",
            "type": "field",
            "value": "Freda Josephine McDonald June 3, 1906 St. Louis, Missouri, US",
            "links": [
              {
                "url": "https://en.wikipedia.org/wiki/St._Louis",
                "text": "St. Louis"
              },
              {
                "url": "https://en.wikipedia.org/wiki/Missouri",
                "text": "Missouri"
              }
            ]
          },
          {
            "name": "Died",
            "type": "field",
            "value": "April 12, 1975 (aged 68) Paris, France",
            "links": [
              {
                "url": "https://en.wikipedia.org/wiki/Paris",
                "text": "Paris"
              }
            ]
          },
          ...
        ]
      }
    ],
    "sections": [
      ...,
      {
        "name": "Early life",
        "type": "section",
        "has_parts": [
          ...,
          {
            "type": "paragraph",
            "value": "Josephine Baker was born Freda Josephine...",
            "links": [
              ...,
              {
                "url": "https://en.wikipedia.org/wiki/St._Louis,_Missouri",
                "text": "St. Louis, Missouri"
              }
              ...,
            ]
          },
          {
            "type": "paragraph",
            "value": "The records of the city of St. Louis tell an alm..."
          },
          ...
      },
      ...
    ]
  }
]
This payload contains a lot of information, but let’s focus specifically on the infobox and sections fields. While their data structures are similar, they represent different parts of the article:
- Infoboxes is a summary box you’ll often find on Wikipedia articles. It contains essential information about the topic, such as birth date and birthplace for a person.
- Article sections provide a section-by-section breakdown of the article content in JSON format. It includes paragraphs, and links; and we are working on adding images, lists, tables and references there too..
Notice the similar data structures for both infoboxes and sections. This design choice allows you to reuse the same logic for iterating through them in different parts of your application. To dive deeper please find those fields and their description in our data dictionary.
Summary
This section outlined how to integrate Structured Contents data into your Knowledge Panel application. We explored the Wikimedia Enterprise API offering and provided a brief explanation of key parts within the payload. This information equips you with a more holistic understanding of our API set and its potential applications.
Build an Authentication UI
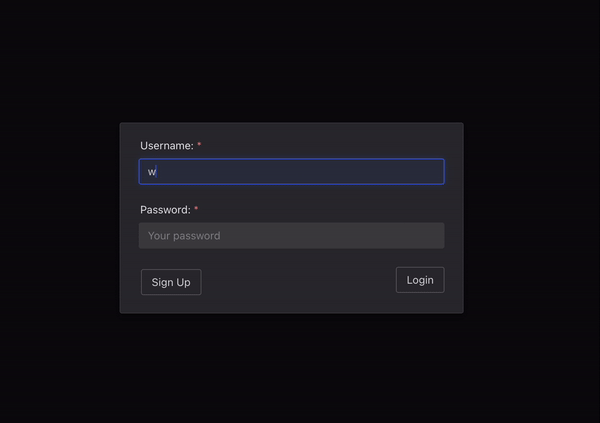
As we mentioned before, we’re going to create a simple modal window that will prompt the user to input their Wikimedia Enterprise credentials to start using our application.
Let’s create the UI and incorporate business logic into our src/components/AuthModal.vue component. This will allow us to trigger API queries to the login endpoint upon the user clicking a login button. To achieve this, we’ll need to write some code. But before we proceed, let’s outline the functionality we need to implement using the given, when, then format:
- GIVEN a user opens a Knowledge Panel application, WHEN they visit the application and are not authenticated, THEN they should see the login pop-up.
- GIVEN a user tries to login using the pop-up window with the form, WHEN they enter correct credentials into the form (username and password), THEN the pop-up window should disappear and allow them to use the application.
- GIVEN a user is using the application, WHEN the access token that the user received during login expires, THEN the application should automatically refresh the user’s access token so that they don’t have to re-login.
- GIVEN a user is using the application, WHEN the refresh token that was received during the login expires, THEN they should be prompted to log in again.
Now that we’re clear on the requirements, let’s proceed to write the code to fulfill them. We’ll begin by adding this code to the src/components/AuthModal.vue:
<script setup lang="ts">
import { NModal, NSpace, NCard, NInput, NForm, NFormItem, NButton, type FormInst, useMessage } from 'naive-ui'
import { type IAuth } from '@/libraries/auth'
import { ref, inject } from 'vue'

// Check if the user is authenticated by checking the presence of an access token in local storage
const isAuthenticated = ref(!!localStorage.getItem('access_token'))

// Loading state for form submission
const loading = ref(false)

// Message instance for displaying error messages
const message = useMessage()

// Form validation rules
const formRules = {
  username: {
    required: true,
    trigger: ['input', 'blur'],
    message: 'Username is required!'
  },
  password: {
    required: true,
    message: 'Password is required!'
  },
}

// Form model for storing form input values
const formModel = ref({
  username: '',
  password: ''
})

// Reference to the form instance
const formRef = ref<null | FormInst>(null)

// Injected authentication service
const auth = inject('auth') as IAuth

// Form submission handler
async function onSubmit(event: Event) {
  event.preventDefault()
  loading.value = true

  try {
    // Validate the form
    await formRef?.value?.validate()

    // Prepare the request payload
    const req = {
      username: formModel.value.username,
      password: formModel.value.password
    }

    // Call the login API
    const res = await auth.login(req)

    // Store the access token and other authentication data in local storage
    localStorage.setItem('access_token', res.access_token)
    localStorage.setItem('refresh_token', res.refresh_token)
    localStorage.setItem('expires_in', res.expires_in.toString())
    localStorage.setItem('auth_time', new Date().toISOString())
    localStorage.setItem('username', req.username)

    // Update the authentication status
    isAuthenticated.value = true
  } catch (err: any) {
    // Handle form validation errors or API errors
    if (!Array.isArray(err)) {
      message.error(err.toString())
    }
  }

  loading.value = false
}

// Check if the access token has expired and refresh it if necessary
const expiresIn = localStorage.getItem('expires_in')
const authTime = localStorage.getItem('auth_time')

if (expiresIn && authTime) {
  const expiresInDate = new Date(authTime)
  expiresInDate.setSeconds(expiresInDate.getSeconds() + parseInt(expiresIn))

  if (new Date() >= expiresInDate) {
    try {
      // Prepare the request payload for token refresh
      const req = {
        refresh_token: localStorage.getItem('refresh_token') || '',
        username: localStorage.getItem('username') || ''
      }

      // Call the token refresh API
      const res = await auth.refreshToken(req)

      // Update the access token and expiration time in local storage
      localStorage.setItem('access_token', res.access_token)
      localStorage.setItem('expires_in', res.expires_in.toString())
      localStorage.setItem('auth_time', new Date().toISOString())
    } catch (err: any) {
      // Handle token refresh errors
      if (!Array.isArray(err)) {
        message.error(err.toString())
      }

      // Clear the authentication data from local storage
      localStorage.removeItem('access_token')
      localStorage.removeItem('refresh_token')
      localStorage.removeItem('expires_in')
      localStorage.removeItem('auth_time')
      localStorage.removeItem('username')
    }
  }
}
</script>

<template>
  <div class="wme-app-auth">
    <n-modal
      :show="!isAuthenticated"
      :close-on-esc="false"
      :mask-closable="false"
    >
      <n-card class="wme-app-auth-card">
        <n-space vertical>
          <n-form
            ref="formRef"
            :rules="formRules"
            :model="formModel"
            @submit="onSubmit"
          >
            <n-form-item label="Username:" path="username">
              <n-input
                placeholder="Your username or email"
                v-model:value="formModel.username"
                v-model:disabled="loading"
              />
            </n-form-item>
            <n-form-item label="Password:" path="password">
              <n-input
                placeholder="Your password"
                type="password"
                v-model:disabled="loading"
                v-model:value="formModel.password"
              />
            </n-form-item>
            <div class="wme-app-auth-actions">
              <a href="https://dashboard.enterprise.wikimedia.com/signup/" target="_blank">
                <n-button>Sign Up</n-button>
              </a>
              <n-button
                attr-type="submit"
                v-model:disabled="loading"
              >Login</n-button>
            </div>
          </n-form>
        </n-space>
      </n-card>
    </n-modal>
  </div>
</template>

<style scoped>
/* setting maximal width for the po-up */
.wme-app-auth-card {
  max-width: 450px;
}

/* making sure that sign-up and login buttons are on the opposite sides of the pop-up */
.wme-app-auth-actions {
  display: flex;
  justify-content: space-between;
}
</style>
At this point, the code we have added does not do anything because it has not been incorporated into the main application component. However, to demonstrate which part of the UI we have just built, we’ll show this simple visual:
Summary
We’ve covered a crucial aspect of every application that utilizes Wikimedia Enterprise APIs: managing credentials when querying the APIs. We provided an example of how to handle that logic and hopefully helped with your integration journey.
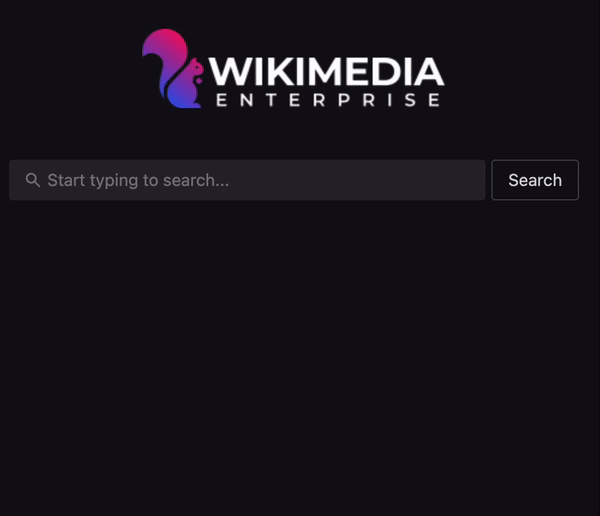
Build a Search Panel UI
To provide the user with suggestions when they start typing into the search bar, we are going to create a component that will integrate the Wikimedia Opensearch API into our application.
In order to do so, we are going to create a separate component that will render the visuals and handle the business logic. So let’s go ahead and create src/components/SearchPanel.vue and put the following code into it:
<script setup lang="ts">
import { NAutoComplete, NButton, NForm, NIcon } from 'naive-ui'
import { Search16Filled } from '@vicons/fluent'
import { ref, inject } from 'vue'
import { type IWMF } from '@/libraries/wmf'

// Define props for the component
defineProps({
  name: {
    type: String,
    default: ''
  }
})

// Define emit function to emit events
const emit = defineEmits(['update:name'])

// Inject the 'wmf' instance from the parent component
const wmf = inject('wmf') as IWMF

// Define reactive variables
const options = ref(new Array<string>())
const loading = ref(false)
const inputValue = ref('')

// Handle form submission
async function onSubmit(event: Event) {
  event.preventDefault()
  emit('update:name', inputValue.value)
}

// Function to get and display suggestions based on user input
function getShow () {
  if (inputValue.value.length > 0) {
    loading.value = true

    // Call the 'getSuggestions' method from the 'wmf' instance
    // and update the options with the returned suggestions
    wmf.getSuggestions(inputValue.value).then((suggestions) => {
      options.value = suggestions[1]
      loading.value = false
    })
  }

  return true
}
</script>

<template>
  <div class="wme-app-search">
    <n-form class="wme-app-search-form" :on-submit="onSubmit">
      <n-auto-complete
        placeholder="Start typing to search..."
        class="wme-app-search-input"
        :options="options"
        :loading="loading"
        :get-show="getShow"
        v-model:value="inputValue"
      >
        <template #prefix>
          <n-icon :size="16" :component="Search16Filled" />
        </template>
      </n-auto-complete>
      <n-button class="wme-app-search-button" attr-type="submit">Search</n-button>
    </n-form>
  </div>
</template>

<style>
.wme-app-search-form, .wme-app-search {
  margin-top: 30px;
  display: flex;
  width: 475px;
  align-items: center;
}

@media only screen and (max-width: 600px) {
  .wme-app-search-form, .wme-app-search {
    width: 340px;
  }
}

.wme-app-search-input {
  width: 100%;
}

.wme-app-search-button {
  margin-left: 5px;
}
</style>
In the code, we are reacting to the event when someone starts typing in the search bar, querying the Opensearch API, and displaying the suggestions received from that API to the user. Again, we have not integrated this part into the code of the main application just yet. However, regardless of that, we are going to show a small visual that will demonstrate what part of the UI we have built with this code:
Summary
This section demonstrates how to use Wikimedia APIs as a complementary part to the Wikimedia Enterprise APIs, illustrating how one would integrate our APIs into their existing workflow or application.
Building UI for the Knowledge Panel
Throughout this section, we are going to build the user interface and business logic for the application. We’ll be using the libraries we created in the previous part of the tutorial.
To build out the panel, we need to create a few UI components. We won’t focus on the creation or the business logic contained in those components. Instead, we’ll link to them and ask you to copy and paste the content of those files into your application:
- src/components/KnowledgePanelSectionText.vue
- src/components/KnowledgePanelSection.vue
- src/components/KnowledgePanelIconLink.vue
- src/components/KnowledgePanelSectionSelector.vue
- src/components/KnowledgePanelReadMore.vue
- src/components/KnowledgePanelAbstract.vue
- src/components/KnowledgePanelIconButton.vue
- src/components/KnowledgePanelFact.vue
Now, let’s bring all of these components together using another component that will contain all the business logic needed to render our Knowledge Panel. To do this, create a component at src/components/KnowledgePanel.vue and put the following code into it:
<script setup lang="ts">
import { NCard, NImage, NSpin } from 'naive-ui'
import { watch, ref, inject, computed } from 'vue'
import { type StructuredContent, type IWME, type Part, PartTypeParagraph } from '@/libraries/wme'
import KnowledgePanelFact from '@/components/KnowledgePanelFact.vue'
import KnowledgePanelIconLink from '@/components/KnowledgePanelIconLink.vue'
import KnowledgePanelSectionSelector from '@/components/KnowledgePanelSectionSelector.vue'
import KnowledgePanelAbstract from '@/components/KnowledgePanelAbstract.vue'
import KnowledgePanelSection from '@/components/KnowledgePanelSection.vue'
/**
* Vue component for the KnowledgePanel.
* This component fetches and displays structured content based on the provided name prop.
*/
const props = defineProps({
name: {
type: String,
default: ''
}
})
// Flag to indicate if the content is currently loading
const loading = ref(false)
// Reference to the structured content
const structuredContent = ref(null as null | StructuredContent)
// Injected dependency for the WME
const wme = inject('wme') as IWME
// Watch for changes in the props.name and fetch the structured content accordingly
watch(() => props.name, async (value) => {
loading.value = true
// Set the access token from local storage
wme.accessToken = localStorage.getItem('access_token') || ''
// Reset the structured content and section index
structuredContent.value = null
sectionIndex.value = 0
try {
// Fetch the structured contents based on the provided name
const structuredContents = await wme.getStructuredContents(value)
if (structuredContents.length > 0) {
structuredContent.value = structuredContents[0]
} else {
structuredContent.value = null
}
} catch (err: any) {
console.error(err)
}
loading.value = false
})
// Computed property to filter and retrieve the facts from the structured content
const facts = computed(() => {
if (!structuredContent.value?.infoboxes) return []
const infoBoxes = structuredContent.value.infoboxes[0]
if (!infoBoxes.has_parts) return []
const sections = infoBoxes.has_parts.map(section => section.has_parts || []).flat()
if (!sections) return []
return sections.filter(part => part.type == PartTypeField && part.name && part.value).slice(0, 5)
})
// Function to filter sections based on their type
const sectionsFilter = (part: Part) => part?.has_parts?.some(part => part.type == PartTypeParagraph)
// Computed property to filter and retrieve the sections from the structured content
const sections = computed(() => {
const articleSections = structuredContent.value?.sections
if (!articleSections) return []
return [
...articleSections.filter((part) => sectionsFilter(part) || part.has_parts?.some(sectionsFilter)),
]
})
// Reference to the current section index
const sectionIndex = ref(0)
// Reference to the active section
const activeSection = ref<Part|null>(null)
// Default text size for sections
const defaultSectionTextSize = 380
// Function to handle section selection
const onSectionSelected = (index: number, section: Part) => {
sectionIndex.value = index
activeSection.value = section
}
</script>
<template>
<div class="wme-app-knowledge-panel">
<div v-if="loading" class="wme-app-knowledge-panel-spinner">
<n-spin size="large"/>
</div>
<n-card :title="structuredContent.name" v-if="structuredContent && !loading">
<template v-if="structuredContent.image" #cover>
<n-image :src="structuredContent.image.content_url" object-fit="cover" class="wme-app-knowledge-panel-image"/>
</template>
<b class="wme-app-knowledge-panel-short-description"><i>{{ structuredContent.description }}</i></b>
<knowledge-panel-section-selector v-if="structuredContent?.sections && structuredContent?.sections.length > 1" :sections="sections" @on-section-selected="onSectionSelected"/>
<knowledge-panel-abstract v-if="sectionIndex == 0 && structuredContent.abstract" :abstract="structuredContent.abstract" :url="structuredContent.url || ''" :abstract-text-size="defaultSectionTextSize"/>
<knowledge-panel-section v-if="sectionIndex != 0 && activeSection" :section="activeSection" :url="structuredContent.url || ''" :section-text-size="defaultSectionTextSize"/>
<knowledge-panel-fact v-for="fact in facts" v-bind:key="fact.name" :name="fact.name || ''" :value="fact.value || ''" />
<template #footer>
<knowledge-panel-icon-link :url="structuredContent.url || ''" text="Wikipedia"/>
</template>
</n-card>
</div>
</template>
<style>
.wme-app-knowledge-panel {
width: 475px;
margin-bottom: 20px;
}
@media only screen and (max-width: 600px) {
.wme-app-knowledge-panel {
width: 340px;
}
}
.wme-app-knowledge-panel-image {
width: 100%;
min-height: 250px;
max-height: 350px;
}
.wme-app-knowledge-panel-image img {
object-position: 50% 0;
}
.wme-app-knowledge-panel .n-card__footer {
display: flex;
justify-content: flex-end;
}
.wme-app-knowledge-panel .n-card__footer a:visited, .wme-app-knowledge-panel .n-card__footer a {
color: white !important;
text-decoration: none;
}
.wme-app-knowledge-panel-spinner {
margin-top: 25px;
display: flex;
align-items: center;
justify-content: center;
}
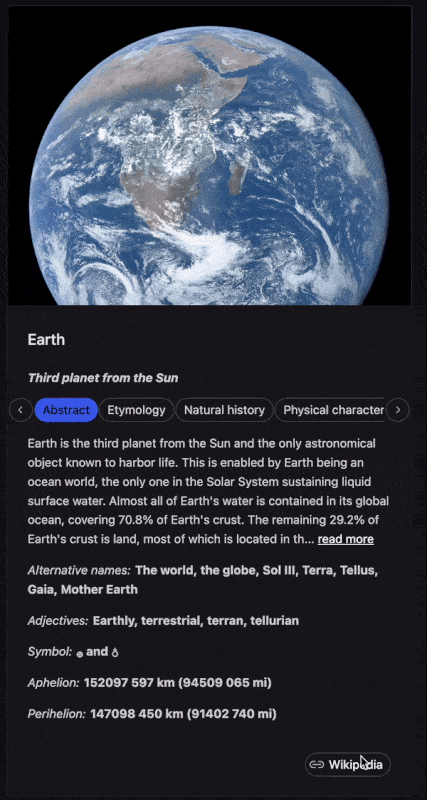
</style>In the code above, we listen for changes in the component properties. If we receive a new article name from the parent component, we fetch the page by name from the Structured Contents articles endpoint. We then render our Knowledge Panel by properly computing facts from infoboxes and traversing sections to get a list of sections to display.
Although we haven’t connected this part of the code to our application yet (we’ll do that a bit later), I think it’s useful to visually show what we’ve just built.
Summary
Here, we’ve demonstrated how one would create a UI using the Structured Contents endpoint response, traverse the data in the response, and apply business logic on top of it. While we’ve built a UI in this example, you can utilize this code in other use cases as well. For instance, you could store this data in a data store to use it in different parts of your system.
Putting it all together
And now we’re reaching the end of the road. With all of this logic behind us, we have only one thing left to do: update the src/App.vue component to connect all of the components and libraries we have created before. To do that, simply replace the content of the file with the following code:
<script setup lang="ts">
import { ref, provide } from 'vue'
import { NLayout, NLayoutContent, NConfigProvider, NMessageProvider } from 'naive-ui'
import AuthModal from '@/components/AuthModal.vue'
import SearchPanel  from '@/components/SearchPanel.vue'
import KnowledgePanel from '@/components/KnowledgePanel.vue'
import { darkTheme } from 'naive-ui'
import { Auth, type IAuth } from '@/libraries/auth'
import { WMF, type IWMF } from '@/libraries/wmf'
import { WME, type IWME } from '@/libraries/wme'

provide('auth', new Auth() as IAuth)
provide('wmf', new WMF() as IWMF)
provide('wme', new WME() as IWME)

const name = ref('')
const primaryColor = '#4263eb'
const themeOverrides = {
  common: {
    primaryColor,
    primaryColorHover: primaryColor
  }
}
</script>

<template>
  <n-config-provider :theme="darkTheme" :theme-overrides="themeOverrides">
    <n-message-provider>
      <n-layout class="wme-app-container">
        <n-layout-content>
          <search-panel v-model:name="name"/>
          <knowledge-panel :name="name"/>
          <suspense>
            <auth-modal />
          </suspense>
        </n-layout-content>
      </n-layout>
    </n-message-provider>
  </n-config-provider>
</template>

<style>
.wme-app-container {
  min-height: 100vh !important;
  display: flex;
  width: 100%;
  justify-content: center;
  padding-top: 50px;
}

.wme-app-container .n-layout-scroll-container {
  display: flex !important;
  flex-direction: column;
  align-items: center;
  min-height: 400px;
}

.wme-app-knowledge-panel {
  margin-top: 15px;
}
</style>
In this piece of code, we have brought all of the components we created previously together and connected them through the application state. This means that when a user enters something in the search bar and clicks the search button, that data will be transferred to the Knowledge Panel component. The Knowledge Panel component will then query the Structured Contents endpoint and render the appropriate Knowledge Panel after receiving the response from the API.
Summary
After completing this section, you’ll be able to explore the Knowledge Panel application you’ve just built! We’ve come a long way to bring this application to life, and now you can enjoy the results. We hope this is just the beginning of your journey with our APIs, as the possibilities are endless, and countless products can be built or enhanced using them.
Conclusion
And there’s the simple way to build a knowledge panel for your application, pulling pre-parsed content from Wikipedia pages. We’ve heard this is helpful for a variety of use cases. If you build a knowledge panel and it goes live, we’d love to hear about it.
You can find the source code of this application in a repo on our github. Also, if you happen to use Go or Python in your application, feel free to leverage our SDKs to help jump start dev. And of course, there’s a live demo of this application available for you to play around with. We’re curious what you will build with Structured Contents data, and any questions, suggestions or feedback you may have! Contact the team.
Read more about our introduction of Structured Contents articles endpoint, and updates to it with parsed article sections and short descriptions.
— Wikimedia Enterprise Engineering Team